Spot UV is a specialty print finishing technique that applies a glossy coating to specific areas of a printed design. Used to emphasize logos, text, or patterns, this process creates contrast and depth by layering shine over a matte, soft-touch background. It’s a powerful tool to add visual and tactile interest.
If you’re planning to use Spot UV in your next print project or just want to learn more about how to design raised Spot UV business cards, brochures, greeting cards, and more, this step-by-step guide breaks down how to prepare your files for a seamless print process. We’ll also provide a video tutorial below.
Spot UV stands out because it contrasts shine against a matte or uncoated background. It draws attention without using additional color, making it a powerful way to add visual interest while maintaining a clean, minimal aesthetic.
Beyond visual appeal, Spot UV adds tactile dimension. Whether it’s a raised logo on a business card or a gloss pattern across packaging, it invites interaction and makes a lasting impression.
Want to learn more about Spot UV and how it can impact your brand? Read our overview on the power of Spot UV to see how this premium finish will transform your business cards, brochures, and other printed materials.
File Preparation: Step-by-Step Instructions
To ensure your file is print-ready, follow these steps in Adobe Illustrator:
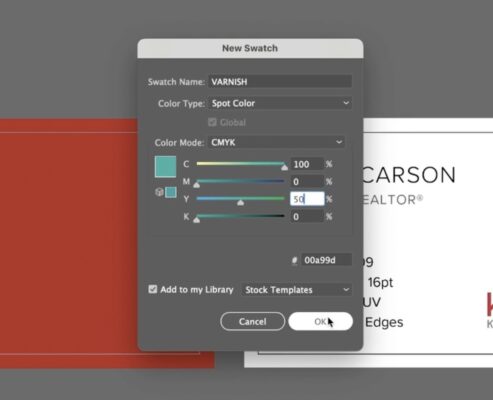
1. Create the Spot UV Swatch
Open the Swatches panel.
Click New Swatch.
Name the swatch Varnish.
Set Color Type to Spot Color.
Keep Color Mode as CMYK and choose any color (the visual color is only for setup).
Click OK to save.
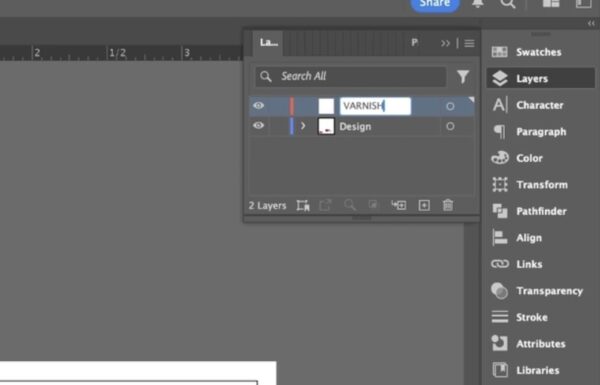
2. Add a New Layer for Spot UV
Open the Layers panel.
Create a new layer and name it Varnish.
This will house all design elements that should receive the Spot UV coating.
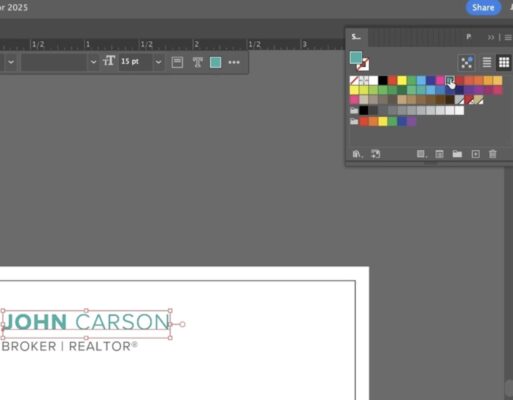
3. Copy and Paste Spot UV Elements
Select the text or graphic elements you want to highlight.
Copy the elements, switch to the Varnish layer, and use Paste in Place to ensure perfect alignment.
Apply the Varnish swatch to the pasted elements.
4. Verify Layer Accuracy
Turn the Varnish layer off and on to confirm which areas are marked for Spot UV.
Ensure your original design remains untouched on the main layer.
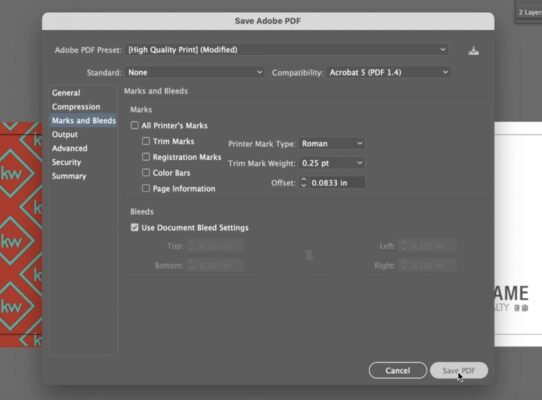
5. Save as Print-Ready PDF
Go to File > Save As and select PDF format.
Choose High Quality Print.
Under Marks and Bleeds, turn on bleeds for 0.125″
Make sure marks are turned off
Before uploading or sending your file, confirm the following:
The Varnish swatch is set to Spot Color (not Process).
All Spot UV elements are on their own Varnish layer.
The design has a bleed margin and correct trim size.
There are no overlapping or misaligned layers.
A print proof is reviewed if available.
Pro Tips & Design Considerations
Keep it simple. Use Spot UV on bold, well-defined shapes or larger text. Thin lines and small fonts may not register cleanly.
Strategic placement. Highlight key branding elements (logos, titles, or graphic accents). Avoid covering too much area.
Combine textures. Spot UV over soft-touch or matte lamination creates a strong visual and tactile contrast.
Avoid edge overlap. Keep Spot UV at least 1.5 mm away from trim lines, folds, and creases to prevent cracking during finishing.
Design For Spot UV Video Tutorial
Next Steps
Ready to bring your design to life with Spot UV? BrandCo offers expert guidance and premium printing to ensure your vision translates perfectly to print.
If you have questions or want a file check before sending your final artwork, contactus and we’ll be happy to walk you through it.